Showing posts with label crafts. Show all posts

Monday, August 26, 2013

Random pictures from August 26, 2013.

Started the morning with a little microscopy.  We picked this up on Sunday at a garage sale for $5.  It needed a light source, so bought a clip-on booklight at the dollar store.  We spent lots of time looking at whatever little particle we could find - onion skin, paintbrush hair, cheek scraping, quarters.  Total score. 


Then onto Costco for lunch.  Hotdogs (Robin eats the entire foot-long by herself) and pizza.


Then met up with some cousins for picnic and bike riding in the park.  There may have been daisy-chain making too.


And I made this in-between - a felt tooth fairy pillow.  I didn't use a pattern, nor have I embroidered before so it's a little crooked and lumpy.  But it'll do the trick.  We don't have a tooth loss yet, but the time is coming close... thought it best to be prepared.


Monday, August 5, 2013

Two Sewing Projects

1. We're totally behind on blogging.  It's been a busy summer.  Expect a flurry of posts when school starts.

2. Brian has taken the girls on a 2-day camping trip. I'm enjoying my mini mommy vacation.

Here's what tonight brought:

First, Erin has mentioned she doesn't have a "lovie" blanket as Robin does.  So I made two nearly matching little lovie blankets.  They have the same black polka-dot fleece backing with the same red-heart on cream background front. But one has purple stain trim, one has red.  I bet I'll have to make a second one of either the purple or red so each girl has the same thing.  So goes sibling squabbles.


The second project was a small bag made from three fat quarters.  These I made *exactly* the same and plan on personalizing with fabric pens once the girls get home.  I was super pleased with the funky fabric, the contrasting orange/red thread, and how it was so simple.  It will make a good little diddy bag for our next adventure! 


Thursday, December 20, 2012

Sewing Project: Grab Bag

OK, totally back posting here.
I got a sewing machine for Christmas!!!!
Here is my first project: a reversible grab bag.

Super duper easy, and Erin has already staked a claim for it as her snack bag for school.


Monday, December 17, 2012

Craft Project: Reusable Snack Bag

I have seen reusable snack bags for sale here and there and though I could do it myself.  A few rectangles of fabric and a strip of velcro later, voila!. 

From the outside:


A crummy picture of the inside.  Sweet fabric, no? 


And I checked out some of the fancy embroidering stitches on my machine.  Cute little leaves. 


So, it's not "waterproof" by any means - I'd have to get some PUL fabric for that.  So snacks left in the bag will quickly get stale.  But they should be fine for a lunchbox, and what a cute way to snack.

Saturday, October 20, 2012

Goodie bags

Filled with chocolate coins, kaleidoscope, temporary tattoos, and mama/baby Manatee lollipops.

Monday, October 1, 2012

5th B-day "Big People" party

This year for Erin's birthday both sets of grandparents will be in Europe. So, we celebrated with them a few weeks early by having an ice cream party!

I think Brian was on photography detail, as I got no pictures of the events.  But here she is one day later, wearing her new birthday dress and doing a birthday project - making a pot holder with a metal loom.


Remember that?  I loved that project as kid!  Actually, it took a lot of restraint not to "help" her a ton and make my own.  She was incredibly focused and even figured out a simpler way to get the cross-loops woven in using her fingers and not the metal hook.  She got about half way done, but we cut her off to start bed time procedures.

Thursday, September 27, 2012

Project: Silly Putty

I first heard about how to make your own silly putty from my boy's Chuck and Josh*.

Ingredients: 
2 tbs water
2 tbs white glue (like Elmer's)
Food coloring
1.5-2 tbs borax


Mix the first three ingredients together thoroughly.  Here, Robin wanted white silly putty so we didn't use the food coloring.  But really, one or two drops is enough.


Sprinkle the borax while stirring.  It's a mild irritant, so I did this carefully while the girls stirred slowly.  
It's like magic - you can see the polymerization as soon as the granules touch the liquid.

When it looks like it's almost completely together, knead for a few minutes.  I did this part as I wanted the grains to mix in as much as possible. 


NOTE OF CAUTION: DO NOT get this on fabric or hair.  Or a disposable pull-up.  Also, it's totally not edible so if your kids are kind of orally interested, maybe try a good playdough recipe. 

Then, have fun! The girls played with it for about 1.5 hours.  The silly putty became everything - ropes, necklaces, snakes, even flashlights, dogs, you name it.  They let it ooze on the glass table and poked into it to make faces.  It was really cool to see them so engaged. 


* Seriously, if you aren't already listening to these guys, go to iTunes or whatever you use, and subscribe, free, to Stuff You Should Know. You'll thank me.  Or maybe not when you spend the next week on a binge, getting caught up over the last 450 podcasts.

Saturday, September 22, 2012

Project: Manatee Lollipop

I got these sweet candy molds today. I know it's hard to see what they will be but stick with me. I thought they would be metal or something a bit more durable than a sheet of plastic and that I'd be able to make some hard-candy lollipops.  But chocolate lollipops are just as delicious, no? 


I put the lollipop sticks in (got a huge pack for a few dollars at Michael's)


I also got some melting chocolate wafers there.  They come in just about every color of the rainbow!  Purple seemed nice.


I poured the melted chocolate into the molds.  And kinda sloppily smooshed/smoothed the top.  Have to work on that technique.


Let it harden for a few hours, and voila!  A mama and baby manatee lollipop.  OK, it's not super pretty yet.  But a few more attempts and they'll be lovely! 


Sweeeeeet. 

Monday, September 10, 2012

Craft: MACRAME!!!!

And you thought people stopped doing Macrame in the early '80's.

So, I found this idea on pinterest, and it was re-enforced through a kid craft book I found at the library.  So easy, and I think any kid about 4 or up can do it.

Take 2 pieces of long yarn, in complimentary colors (this is a good thing to let the child decide).   Fold them in half and tie a loop in the middle.  Tape the loop onto a firm surface.  We used a square plastic picnic plate, turned upside down. Tape down one of each color string to the bottom. Show the child how to make alternating knots.  For Erin here, the white color I showed her to make a "4", then loop the end under, and....


... pull up to make the knot.  The right side will make a "P" shaped loop.  She proudly told Dad that she was making him something full of "4's and P's".  He looked puzzled, but was encouraging. 


Step and repeat until it's long enough for a friendship bracelet.


OK, so Erin hasn't finished the project yet, but she will.  It's a present for Brian so SHHHHHHHH....

Wednesday, August 15, 2012

1000 posts and Lavender Wands

That's right, folks!  We've been entertaining you for 1000 posts.  To celebrate, I'll share a recent project that I really liked: Lavender Wands.  My parents had gotten me one of these YEARS ago from a street fair.  I looked up some youtube instructions and realized how easy it is.  All you need is 16 sticks of lavender and some ribbon.

Line up the lavender so all the tops are even at the base.


Tie at the base of the flowers with the ribbon.  I actually also first tied it quite snug with some thread wrapped around a few times.


Bend the stems of the lavender over to create kind of a "basket". If you want, you can just tie where the flowers end.  But I like the ribbon effect.  Weave the ends of the ribbon in/out of the stems, alternating the left and right ribbon. 


OK, so I ran out of ribbon on this one, but you can see the top woven part of the ribbon how lovely it can be.


Here's one I did last week for Erin.  The nice thing is it smells really good, and dries. The one I had from my parent's still smelled lovely after many years.  You can put them in your underwear drawer, or if you have a cedar chest the lavender will help keep the bugs away.  Or, if you're a daughter of mine you'll use them as a magic want to transform your parents into all manner of bird and beast. 


Saturday, August 4, 2012

Craft project: Crochet Doll Dress

Erin has become attached to this little doll, one from my childhood.  Originally named Charlotte, she has a new moniker, Mirabelle.  Mirabelle has been wearing an old dress, so I though I'd use up some scrap yarn and make her a new dress. 


Mirabelle is much happier now. Pattern here.

Thursday, August 2, 2012

Knitting project: Baby Hat

I made this hat for my cousin Sean, about to have his little girl.  It's a newborn size but the yarn is really slippery.  After blocking it, I think it'll be more a 6-12 month hat.  Either way, it was a darling, fast pattern.  I like the eyelet detail and decided a sweet ribbon would look nice in it. 


Pattern here.


Friday, July 6, 2012

Knit project: "5 hour sweater"

The actual knitting took about 12 hours, but I'm kinda slow.  Then I let it sit, unfinished, for about a year.  But now, with a new 2nd cousin almost here, I had a reason to finish it and send it out.  So, another 15 minutes of tucking in the ends and sewing on a button, voila!  I give you a cute, "5 hour", 1 year baby sweater! 


Tuesday, June 12, 2012

Jellyfish!!!!!

Yesterday, Erin and Robin received a "Make Your Own Jellyfish" kit in the mail from their dear friend Henry.  This was awesome.  Super awesome.  

The kit: 1 balloon, 8-9 pieces of string, 10 or so pieces of tape (stuck on a laminate sheet, ingenious I tell you!) 

So simple, right.*  

Instructions: 
1. You blow up the balloon. 


2. You tape on the tentacles. 
3. You bloop bloop the jellyfish. 


Oh, was there bloop blooping!  Blooping all over the house.  Blooping at each other.  Blooping in the bath.  Such a great activity!  Thanks, Ms. Christie, and Henry.


*OK, simple yes.  But still, like most Julia Child recipes there's lots of room for interpretation.  One: I did not blow up the balloons nearly as much as Ms. Christie Illustrated.  2. I taped the tentacles on in the middle so they would be more numerous but not as long as intended.  I chalk it up to a lesson in "it was fun so it was OK." 

Saturday, June 9, 2012

Crochet project: Soap Spongie

Not sure what to call this, but I had an idea to make a little crochet sleeve for little bits of soap from all the leftover acrylic yarn I have.  It seems like a useful idea: a little pouch you can put all the crumbling slivers of soap into, and use it as a sponge/washcloth.  Using scraps of soap and scraps of yarn to make something useful?  Doesn't get any more frugal than that.

First attempt:

A cute little pouch, and it will certainly fit the bar of soap from beginning to end. 

The second attempt incorporated a few minor improvements: 


A slightly scalloped edge to bind the edges. Not sure what difference this will make mechanically, but looks a bit fancier.  A looped edge for hanging to dry in the shower.  And a slightly beveled front flap.  I might add in a little button to close it, but that might feel bumpy when showering.

This particular yarn (yes, same for both, different photography conditions.  Need work there I guess) is acrylic, kinda thick, and should hold up well in the shower.

Thursday, April 26, 2012

Knitting project: Front Pocket Sweater

I actually started this project late last June, many moons ago and before I understood things about yarn weight and gauge.  It took a while and more yarn than I anticipated, but it turned out OK.  It's exactly the lumpy, frumpy home knit sweater you'd imagine your little old granny making you.  I did like the pattern and how the pocket was done at the same time as the sweater body.  Erin picked out the yarn.  While it's lumpy and frumpy, it actually is nearly perfectly sized on her. So unless she gains about 75 lbs in the next couple of months, it will remain a lumpy, frumpy sweater until she grows out of it.

Friday, April 13, 2012

Paint!

This started out as a simple paint a wooden butterfly (thank you, dollar bin at Michael's) and of course turned out to be a full-body exploration of paint and color


I just love how they get so into their work. They were very serious about the whole affair. 


I am starting to get smarter about these things.  I put out the paint, already poured (just a little teeny bit) and used cotton swabs as the brushes.  Not that that mattered, within a few minutes they'd discarded the cotton swabs for fingers.  Then hands.  Then whole bodies.  Yes, they made belly-button prints.  And the mess was quite minimal since there was only about 1 tbs of paint in each of 6 egg-carton wells.

Saturday, January 21, 2012

Knitting Project III: Fingerless Gloves

Technically, this project is only HALF done (still need to do the other glove).  This was supposed to be for Erin since she's been asking for mittens for awhile now.  I thought fingerless gloves would be a little more functional for her.  I used the smallest needles and a thin yarn.


Yet this pattern is still WAAAAAYYYYYY too big for her. Might look good on me though. . .  Will have to find her a kids size pattern. 

Thursday, January 12, 2012

Knitting project II and bonus crochet project

DSC_0026

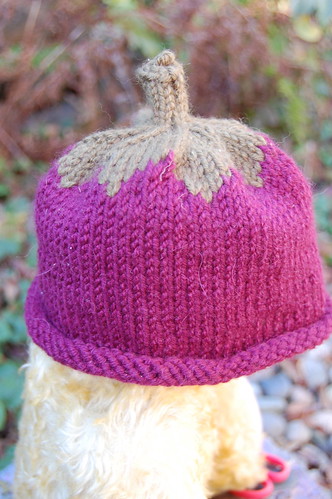
A cute "eat your veggies" hat for my nephew, Kai. I've made 4 of these hats in the last month or so, but this one turned out the best.

DSC_0009

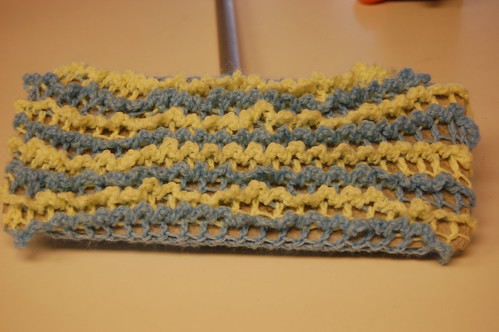
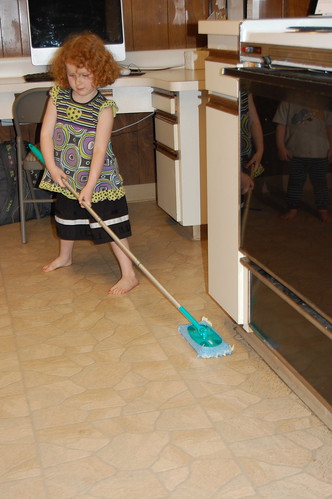
A crochet Swifter cover. Found this idea yesterday on Pinterest. Needless to say it was a fast project. Erin enjoyed the results and quickly started cleaning. Double bonus!

DSC_0024